What's New in Propel Rx 1.8
Key Enhancements and Fixes in This Release
Enhancements
To learn more about the Auto Refill enhancements, select the dropdowns below.
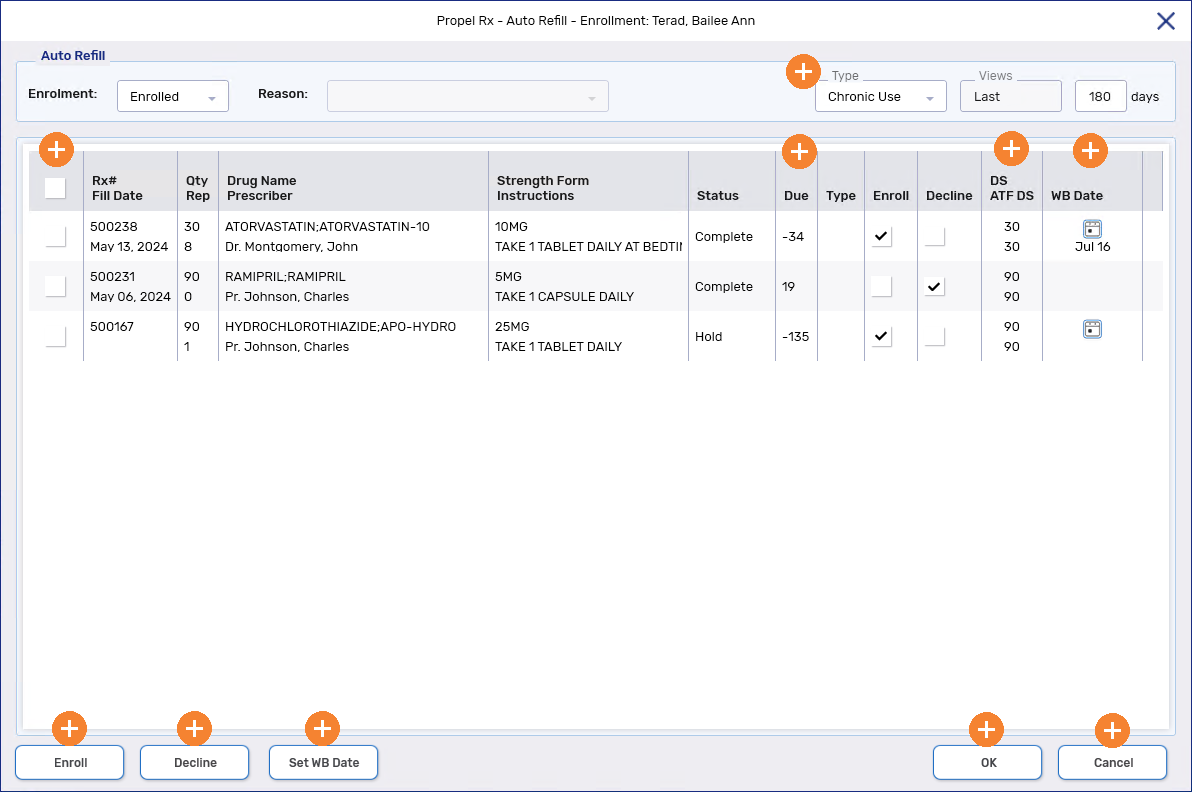
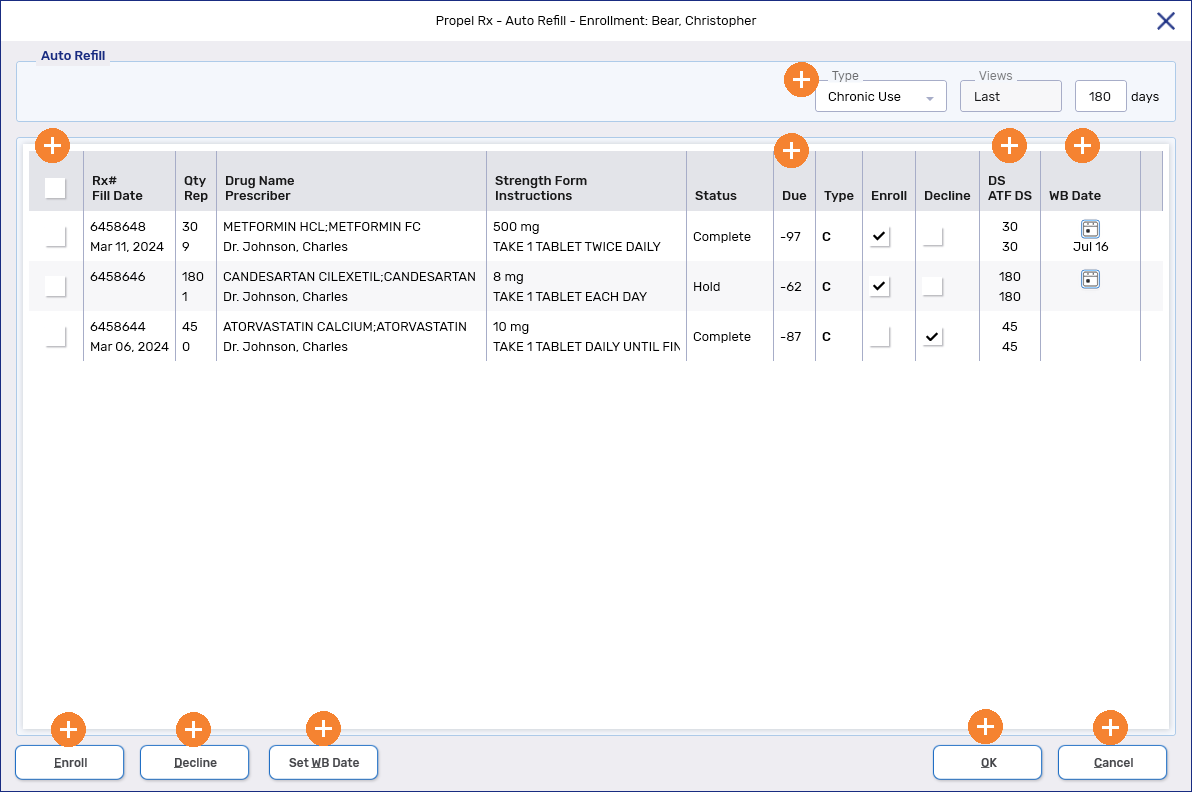
To learn more about the changes made to the Auto Refill - Enrollment window, select the expander icons ![]() in the image below.
in the image below.
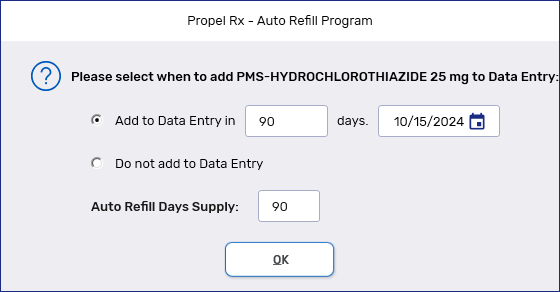
Auto Refill Days Supply is a new field in the Rx Detail Extended tab and Auto Refill windows. The value entered in this field will now be used to calculate the future fill date of an Auto Refill prescription instead of the Days Supply. Auto Refill Days Supply is used only for Auto Refill prescriptions; it is not transmitted to Third Parties and does not appear on labels, reports, forms, or Patient Centre. The value entered for Auto Refill Days Supply is carried forward on refills and reauthorizations.
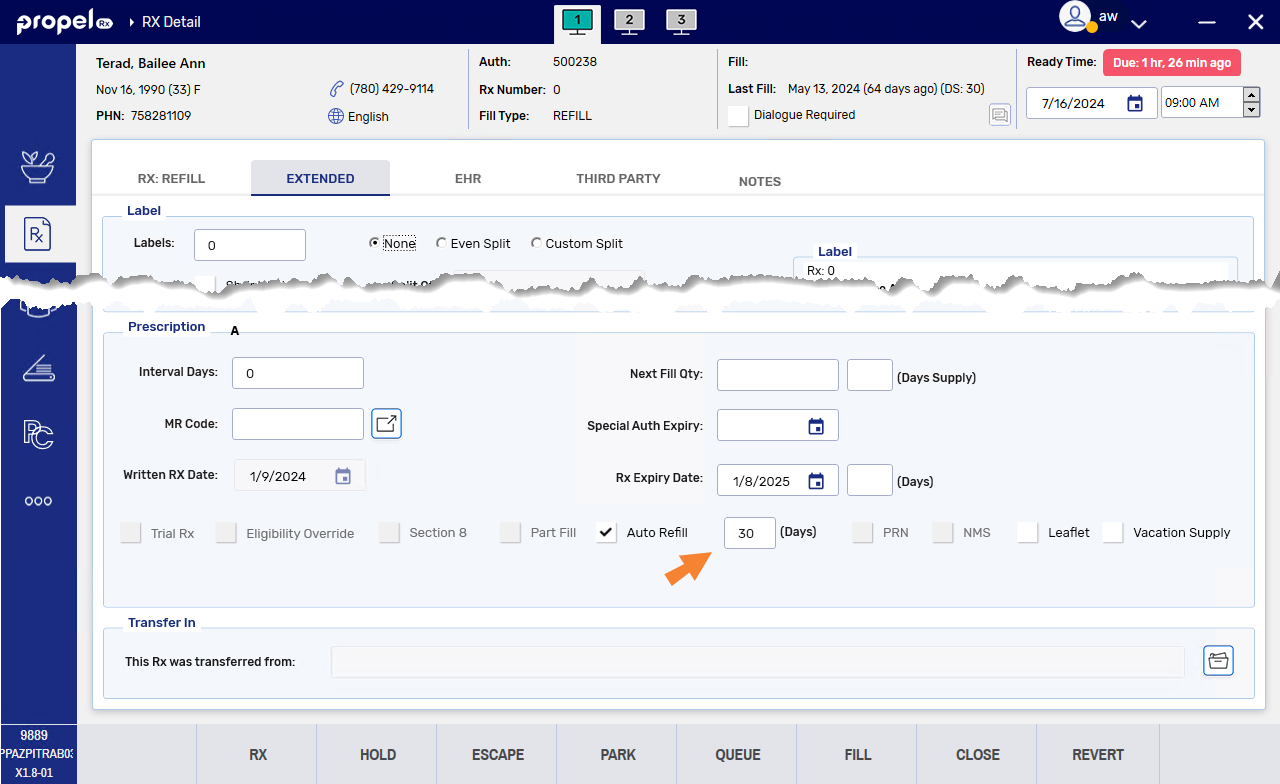
Auto Refill Future Fill Date Calculation
The future fill date for an Auto Refill prescription is now calculated as follows:
For more information, see Setting an Auto Refill Days Supply.
You now have the option to edit the WB Date for the next fill of an Auto Refill prescription. This can be done from the Auto Refill - Enrollment window or Patient Profile. For more information, see Editing the Workbench Date for an Auto Refill Future Fill.
A prescription can be added to the Workbench through Auto Refill or the Add to Workbench prompt when refilling a prescription from the Patient Profile. Previously, you had no visibility into who added a prescription to the Workbench and when it occurred. To address this, a row will now be entered in Workflow Details whenever a prescription is added to the Workbench. The following information will be recorded:
-
Action - Added to WB
-
Completed On - timestamp the prescription was added to the Workbench
-
User - ADM if it was automatically scheduled or the user if it was manually scheduled.
-
Automatically scheduled refers to Auto Refill prescriptions that were scheduled by Propel Rx using the Auto Refill Days Supply.

-
Manually scheduled refers to Auto Refill prescriptions that had their WB Date edited, or prescriptions that were placed on the Workbench using the Add to Workbench prompt.

-
Details - indicates whether the refill was scheduled manually or automatically and its Days Supply. For prescriptions enrolled in Auto Refill, "Auto Refill" will be indicated and the Auto Refill Days Supply will be displayed alongside the Days Supply if they differ. If the Auto Refill Days Supply is the same as the Days Supply, only the Days Supply will be shown.
-
In Propel Rx, you can use calendar controls to change how a grid is displayed. You can find these controls in different parts of Propel Rx, such as the Workbench, Activities, PrescribeIT® Messages, and Clinical History. These controls have also been introduced to the Daily Rx Count window in this version.

In the past, when you specified a date range, the starting date was automatically set to the first day of the week or month, and you couldn't change it. Now, you have the option to choose the starting date in a date range.
The options in the Calendar window have been updated as follows:
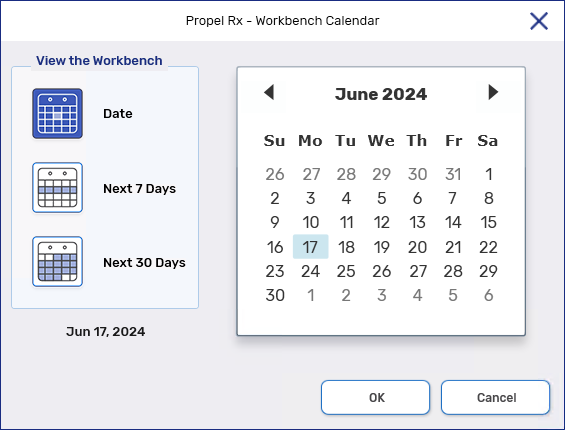
-
By Day to Date
-
By Week to Next 7 Days
-
By Month to Next 30 Days
This option shows records that fall between the chosen date and the following 29 days.
Once you choose an option in the Calendar window and select OK, the selected date or date range will be shown above the calendar buttons for the grid.
We made some changes in Propel Rx to improve the way product checks are documented. Before, Workflow Details did not differentiate product checks that occurred on-site versus off-site, such as in the case of Central Fill prescriptions. To address this gap, we split the Technical Validation or Clinical Review step into two steps: Entry Check and Product Verify. This distinction makes it clear where a prescription was checked and provides better audit protection for pharmacies. Please note, this is a visual change to Workflow Details and the process of completing Technical Validation or Clinical Review remains the same.
This enhancement only applies to prescriptions processed after the Propel Rx 1.8 upgrade that flow through Technical Validation and/or Clinical Review. If these queues are not enabled in Workflow Preferences or Packager Preferences, the layout of Workflow Details remains unchanged.
Definitions
-
Entry Check - the process of checking prescription details entered in Propel Rx for accuracy. This is done by the pharmacy that adjudicated the prescription.
-
Product Verify - the process of checking the prescription's packaging for accuracy. This is done by the pharmacy that packaged the prescription. This may or may not be the pharmacy that adjudicated the prescription.
Workflow Details
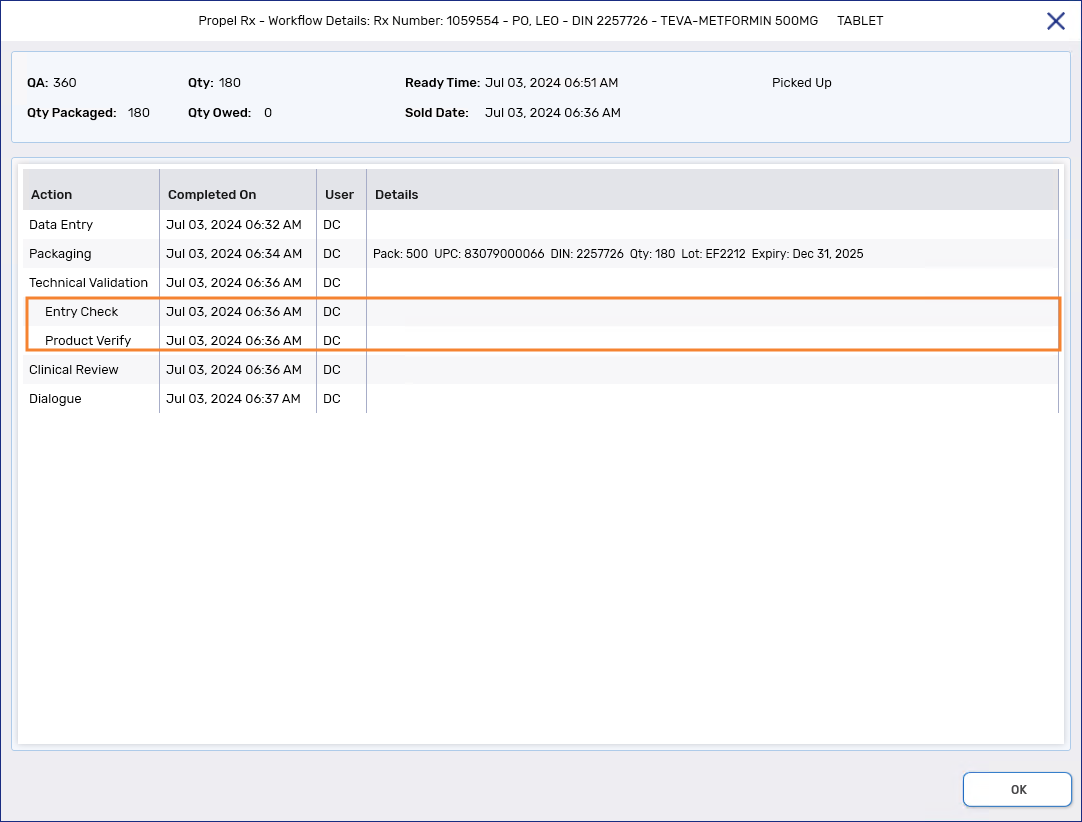
In the different parts of Propel Rx where Workflow Details are shown (i.e., Workflow Details window, e-File copy, Electronic Hardcopy report), Entry Check and Product Verify steps now appear under Technical Validation or Clinical Review depending on the queues that are enabled:
-
If Technical Validation is enabled, you'll see these steps appear under Technical Validation.
-
If Technical Validation is not enabled, you'll see these steps appear under Clinical Review.
For each step, Propel Rx records information based on whether the prescription was sent to an off-site packager or not. For the Entry Check row, the user who completed Technical Validation or Clinical Review and the timestamp are recorded. For the Product Verify row, the following information is recorded:
-
If the prescription was packaged on-site, the Product Verify row contains the same details as the Entry Check row.
-
If the prescription was packaged off-site, the Product Verify row displays a comment indicating the prescription was packaged off-site. No user or timestamp is recorded.
-
If the prescription was placed on Hold, the Product Verify row does not appear.
For example, the following image shows the Workflow Details of a prescription that was packaged on-site:
We made it easier to enter expiry dates for pack sizes in Packaging. Now, you can omit dashes (-) and slashes (/) when entering the expiry date. Propel Rx will assume that the dates you enter are in the formats MMYY, MMDDYY, or MMDDYYYY. If you only enter month and year, Propel Rx will assume the last day of the month as the expiry date.
The format MMYYYY is not supported. If you enter 012025, the expiry date will be Jan 20, 2025, not Jan 2025.

For example:
-
0125 will be interpreted as Jan 2025 (in Workflow Details, it will appear as Jan 31, 2025)
-
013125 will be interpreted as Jan 31, 2025
-
01312025 will be interpreted as Jan 31, 2025
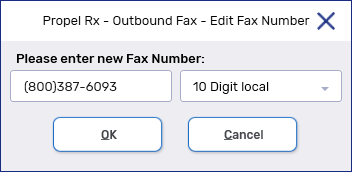
We have added a new action button that allows you to edit fax numbers that are missing or incorrect in the Fax tile. You can use this button for Minor Ailment faxes that do not have a fax number, as well as any faxes that have a Failed status. For all other faxes, you cannot edit the fax number.
To edit a fax number from the Fax tile:
-
Navigate to the Fax tile.
-
Select the Outbox.
-
Select the fax whose fax number you want to edit.
-
Select Edit Fax #. The Outbound Fax - Edit Fax Number window opens with the current fax number, if it exists.
-
Edit the fax number and select your dialing preference.
-
Select OK. The fax will transition to a Queued status.
Several enhancements have been made to our integrated Minor Ailments module. These changes have been organized under the various steps in the Minor Ailments process to which they apply. Select the dropdowns below for more information.
Previously, each Minor Ailment document was written back to Propel Rx in 2 formats: JPEG and PDF. Going forward, only the JPEG format will be saved in Propel Rx. If a Written Prescription is included in the write back, it will be sorted as the first attachment for easy reference.

For PFS prescriptions written back from RxConsultAction, the SIG will now include the first and last name of the pharmacist who completed the Minor Ailment service (e.g., SIG = Consultation Provided by Charles Po).
We made an enhancement that allows you to see and print up to 120 characters of a medication's instructions that were written back from RxConsultAction. This is an increase from the previous limit of 60 characters. The following areas of Propel Rx are affected by this change:
-
Intake SIG field
-
Rx Detail SIG field
-
Half, Thermal, Daily Laser label instructions
No changes were made to reports.
When prescriptions with instructions longer than 120 characters are written back from RxConsultAction, Propel Rx will automatically process them up to Rx Detail. However, a validation error will occur, preventing the prescription from completing Data Entry until the SIG is shorted to 120 characters or less. If you need to include additional information, you can use the Additional Instructions function accessed from the Rx menu.

For reference, the entire instructions written back from RxConsultAction will be visible in the SIG preview sections of Intake and Rx Detail. However, once you modify the SIG, the expanded instructions in the preview section will be lost. If you edited a SIG in error, select Cancel in the Intake window or Escape in Rx Detail to undo the changes.
We have automated the process of notifying a patient's prescriber of a Minor Ailment service. The Professional Summary document will now be automatically faxed to the professionals listed in the Documentation Management section upon conclusion of a Minor Ailment service in RxConsultAction. This feature will only be available for pharmacies using Cloud Fax. If your pharmacy does not use Cloud Fax or you would like to fax other Minor Ailment documents to the prescriber, you must do so manually. For more information, see Notifying the Prescriber of a Minor Ailment Service.
A new Follow-Up section in RxConsultAction allows you to schedule Follow-Up Activities automatically in Propel Rx. The following information can be entered in this new section:
-
Status - you can set the status of the Activity to either To Do or To be received. In Propel Rx, there is no difference between these options. Follow-Up Activities will show up in the Activities tile with an Open status.
-
Who - this corresponds to the user who will assigned to the Activity. If Me is selected in RxConsultAction, the Activity will be assigned to the pharmacist user who completed the Minor Ailment service. If you choose any other option, the Activity will not be assigned to any user in Propel Rx until it's processed.
-
When - this lets you choose the date when the Follow-Up Activity should show up in the Activities tile. If you select Following a specific date, the Activity will be scheduled for that date. If you choose a date range, the Activity will be scheduled for the first date in that range.
-
What - this is where you can enter information about what you need to follow up with the patient on. Anything you enter in the Details fields will be written as Comments for the Activity.
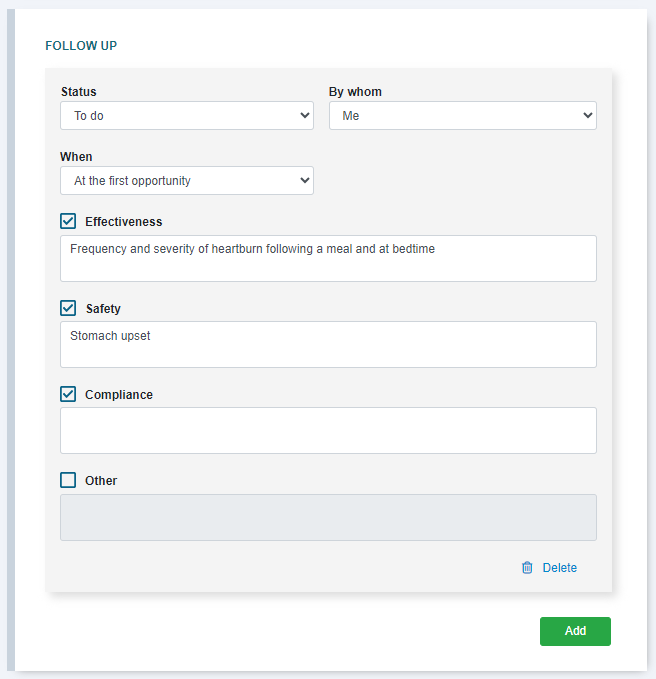
For more information on the Minor Ailments Follow-Up Activity, see Scheduling a Follow-Up with the Patient.
The process for completing a Minor Ailments Follow-Up Activity is the same as before. Each Follow-Up Clinical Note will appear as a separate entry in the Patient Folder Clinical History section. However, some information will be pre-populated for the follow-up:
-
Description - this will be the type of Minor Ailment consultation that was conducted.
-
Patient and Prescriber - these will be the same as the initial Clinical Note for the Minor Ailment service.
-
Rx # and DIN - these will be the same as the initial Clinical Note, but you can change or remove them if needed.
-
Comments - these will be the notes you entered in RxConsultAction for the follow-up.
-
Page - the initial Clinical Note for the Minor Ailment will be added as the first page of the Clinical Note. In the Clinical History, the initial Clinical Note will still be shown as a separate record from the Follow-Up Clinical Note. If multiple follow-ups were scheduled, only the earliest Follow-Up Activity will be linked to the initial Clinical Note.
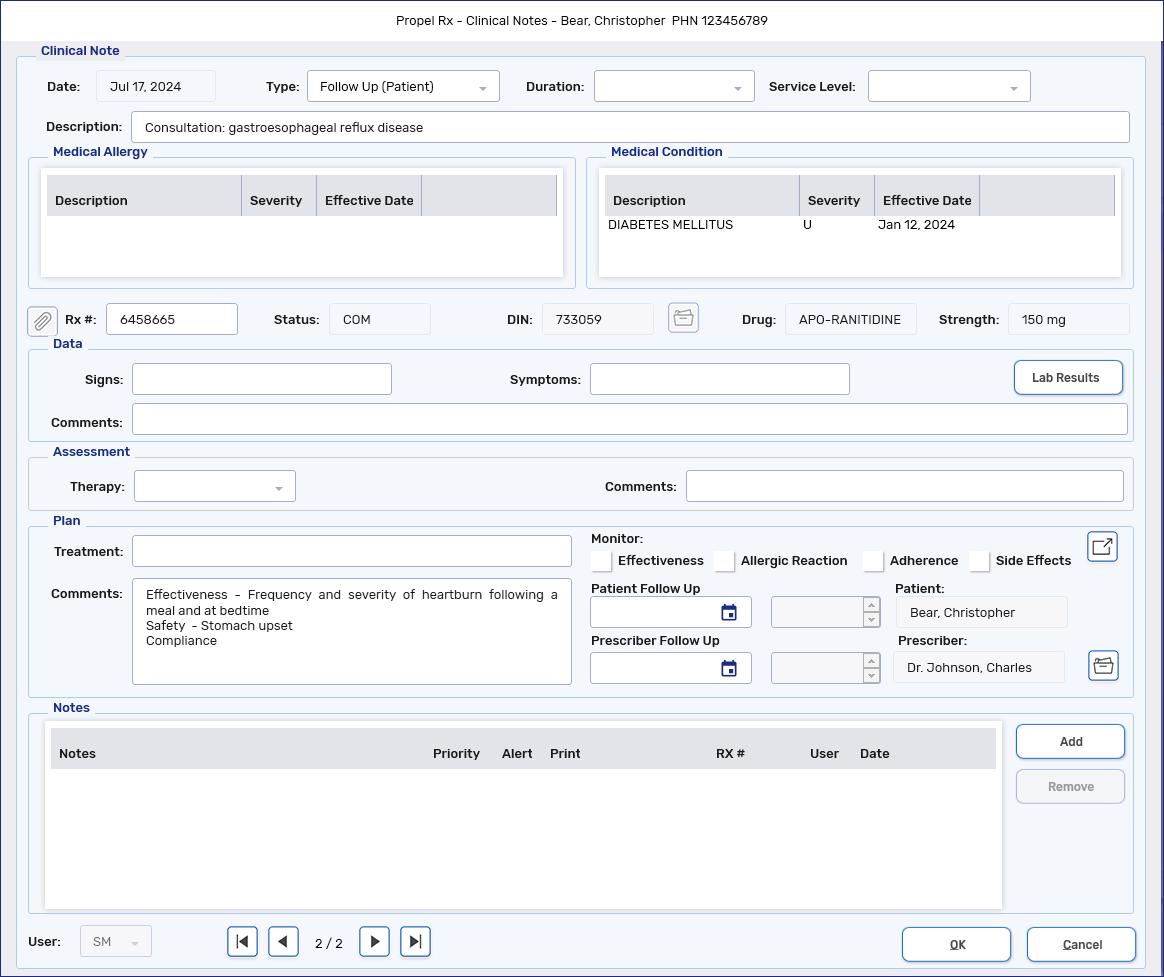
For more information, see Completing a Follow-Up with the Patient.
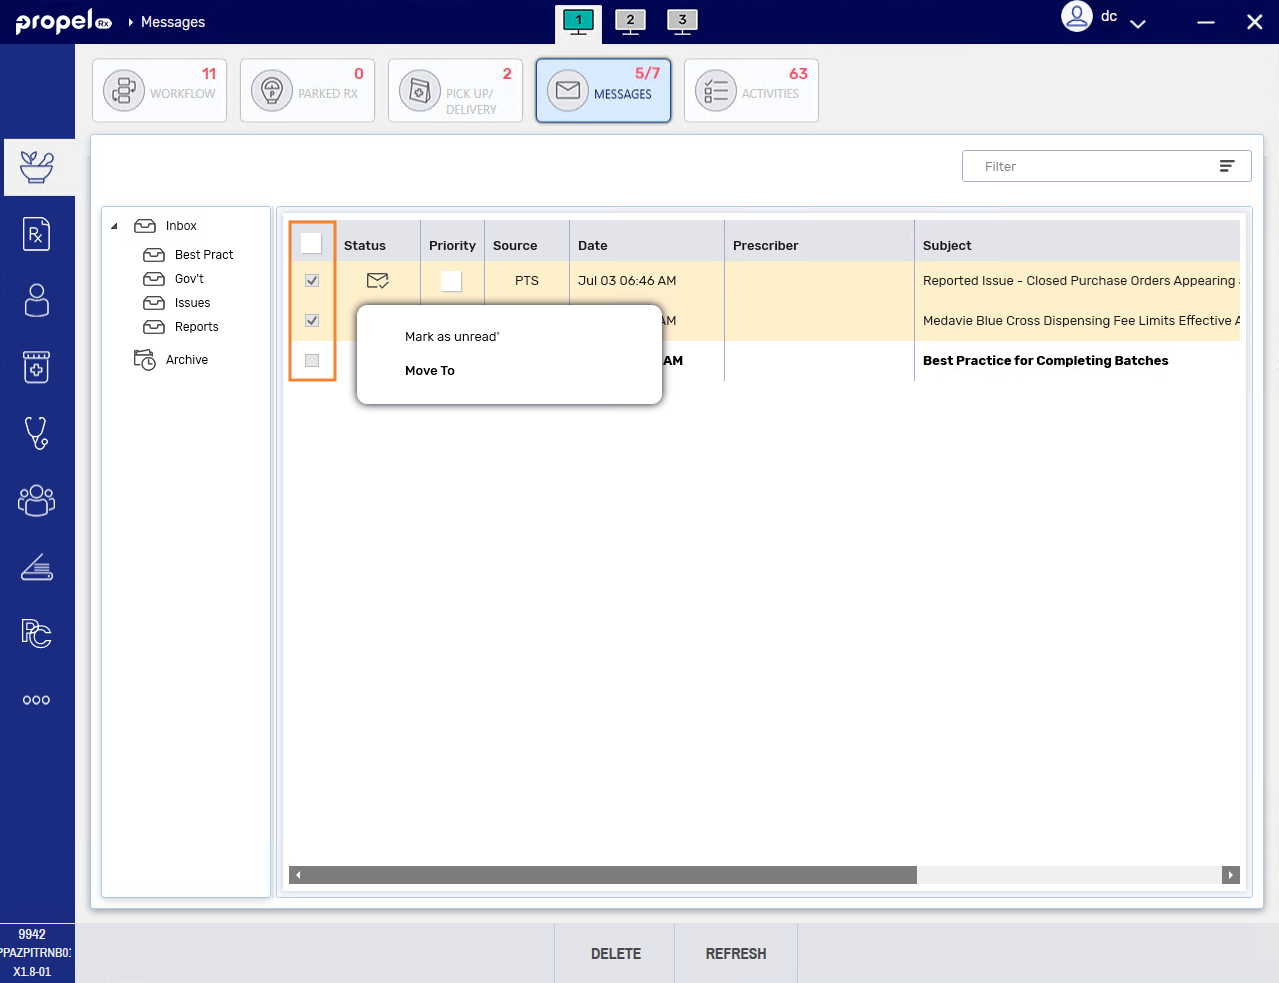
A new checkbox column has been added to the Messages tile to make it easier to manage messages. Clicking on a row automatically turns the checkbox for that row ON. Multiple messages can be selected by simply clicking on the rows. To select all messages, select the checkbox in the header of the column.
Once you have selected one or more messages, you can perform the following actions in bulk:
-
Delete them all at once
-
Move them to another folder (by right-clicking)
-
Mark them as unread (by right-clicking)
If you want to quickly deselect all messages, you can deselect the checkbox at the top, select Refresh, or navigate to another Messages folder.
The following reports have been reinstated in Propel Rx Reports:
-
Inactive Inventory
-
Medication Dosage Calendar
-
Patient Profile
-
Purchase Order Print
-
Sales Summary
These reports will open in the old Propel Rx Reports layout.
When you place a packager prescription on Hold and Clinical Review is enabled as a queue for that packager, the prescription will now flow through Technical Validation, regardless of whether Technical Validation is enabled for that packager in More (...) > Pharmacy > Workflow > Packager.
Verifying Prescription Images
To verify prescription images:
-
Process the prescription into the Aggregate window.
-
Select an Attachments button with a red border
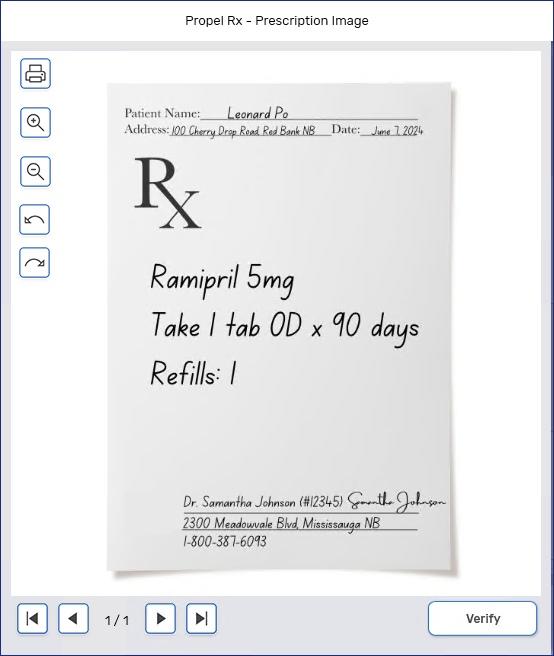
 . The Prescription Image window opens.
 -
Review the image in the Prescription Image window.
-
Select Verify to confirm the prescription. The Prescription Image window closes, and the red border around the Attachments button will disappear. The Verify button for the prescription will change to Verified.
-
Repeat steps 2 - 4 for the remaining prescriptions that require viewing their attachments.
-
Verify the remaining prescriptions (Refills) as usual.
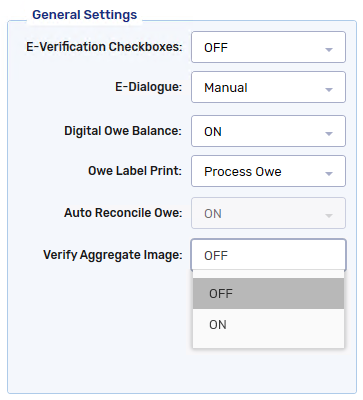
The Verify all button is disabled until you have viewed all required prescription attachments.
-
Once you have finished verifying all the prescriptions, select Validate or Sign Rx.
If you completed Technical Validation or Clinical Review in isolation, you are not required to verify the prescription image again in Workflow.
Verifying Prescriptions without Attached Images
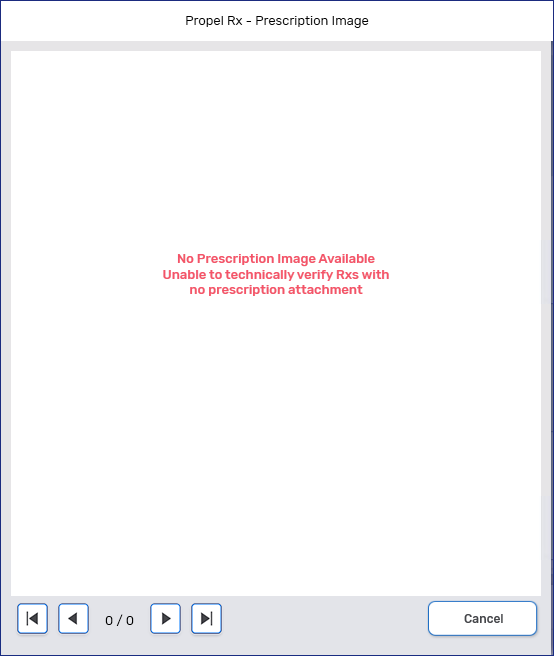
If a New, ReAuth, or Hold prescription does not have an attached image, the Prescription Image window in the Aggregate window will look like the following:
-
The Verify button will be absent because the prescription cannot be verified.
-
A message will indicate that no prescription image is available.
To proceed, select Cancel and attach a prescription image. Once the image is attached, you can verify the prescription.
To scan a prescription from the Aggregate window:
-
Select one or more prescriptions that the document should be attached to.
-
Select Rx > Attachments > Single Scan or Duplex Scan.
-
A validation prompt appears. Select OK to proceed with scanning.

-
Once the scan is complete, the Image Preview window opens. Review the scan.
-
Select Accept.
-
Proceed with verifying the prescription image.
Fixes
-
When performing an Amend Next on an Auto Refill prescription, the changes should now apply to the future fill on the Workbench. This fix also addresses the issue of negative Quantity Authorized (QA) values when refilling an Amend Next Auto Refill prescription.
-
You can now select multiple drugs when generating the Inventory Reconciliation History Report. To do this, enter the DINs and/or drug names separated by a forward slash (/) in the Specific Drug/DIN field. If you enter a drug name, you can select multiple drugs with that name from the Drug Search window by holding the CTRL key while making your selections.
For example, Specific Drug/DIN = 2438275/2167786/2380218
Sunsetted
The Print button in the Auto Refill - Enrollment window has been removed.
Three additional reports that were heavily scheduled have been migrated to the new Propel Rx Reports framework:
-
Waiting For Pick Up/Delivery
-
Gross Profit by Third Party
-
Gross Profit by Prescription
With the migration of these reports, the old Report Scheduler has been removed. CPS will now be used to schedule reports that have migrated to the new framework. Any reports that open in the old framework cannot be scheduled.
-
Analysis by Doctor
-
Analysis by Drug
-
Compliance Preparation Log
-
Detailed Transaction Summary
-
Drug Movement
-
Eligibility List
-
Facility Admission List
-
Frequency of Dispense Expiry Report
-
Inactive Inventory
-
Inventory Summary
-
Inventory Totals by Drug
-
MAR
-
MAR Custom
-
Medication Dosage Calendar
-
Mixture Movement
-
Network Discrepancy
-
Nursing Charges (Group)
-
Nursing Charges (Patient)
-
Nursing Charges Summary
-
Packing Slip
-
Patient List
-
Patient Mailing Labels
-
Patient Profile
-
Potential Missed Doses/Billings
-
Prescription Non-Compliance
-
Purchase Order Print
-
Sales Summary
-
Special Authorization Expiry
-
TAR
-
Time Analysis
